
Traktor is a DJ software that lets you mix music. Like any creative software, there are no limits to its use other than those imposed by your own imagination. Let us show you the software's technical side so you can focus on the artistic side.
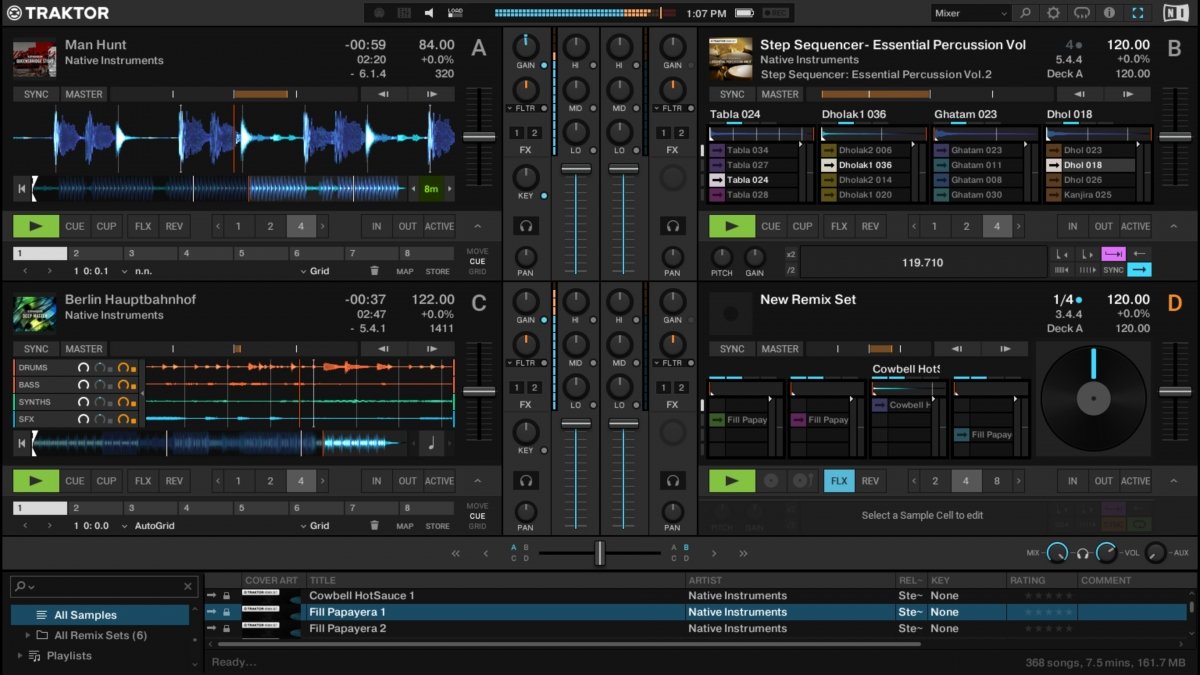
When you open Traktor for the first time, you will see how its main interface looks like. Let's start by saying that, at the top, on both sides of the screen, the decks where the music files to be played are placed are displayed. Between them, you will find is the mixer with volume and equalization controls. At the bottom, there is a folder and file browser to find your audio files.
 Traktor’s main interface
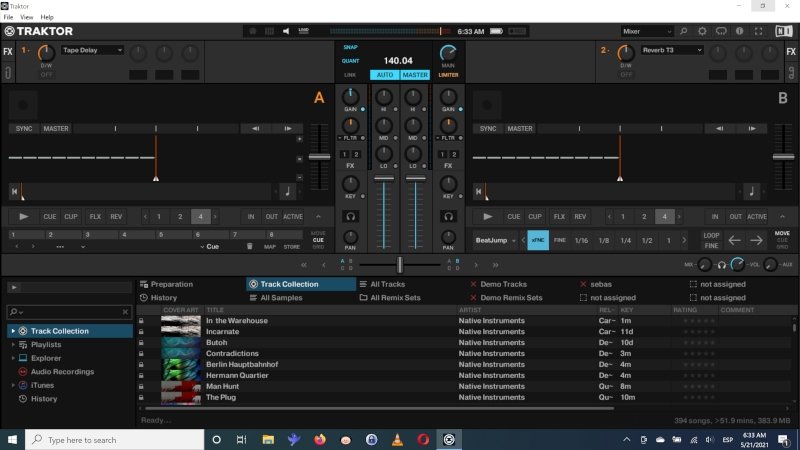
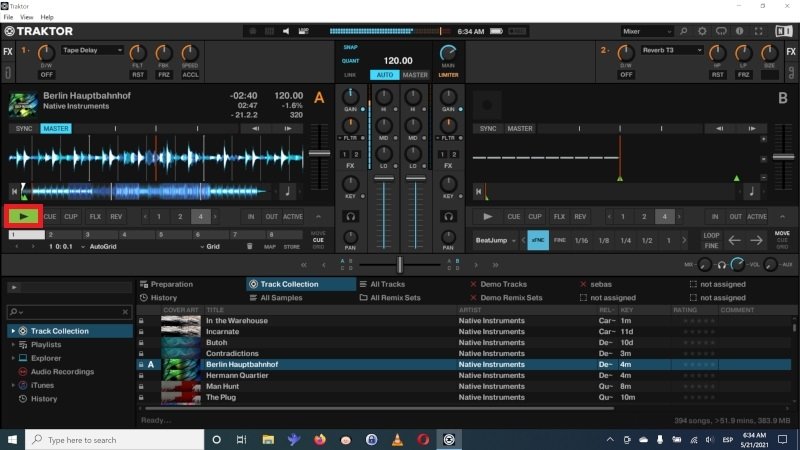
To start playing music, just select and drag any audio file you have located with the explorer to any of the players, A and B. Traktor will analyze the song's content, and after a few seconds, it will show you its wave signature in the player, scrolling as usual in audio players from left to right. Click the Play button, make sure that channel A of the mixer has the volume fader turned up, and you will be able to hear the song.
 A song playing
From here, you just have to chain the playback of different players using the mixer options to create your music session. Now that you know the basic functions, it is time to talk about other aspects that are very important for software operation.
How to configure the audio card in Traktor
To get Traktor to work properly, you will need to make sure that the audio card is correctly configured in the settings. The audio card will handle all the data necessary for the correct operation of the software, so its performance is relatively important. An integrated audio card may be sufficient for very basic applications, but if you are looking for more advanced features, such as an internal listening CUE for the mixer, you will need a dedicated sound card.
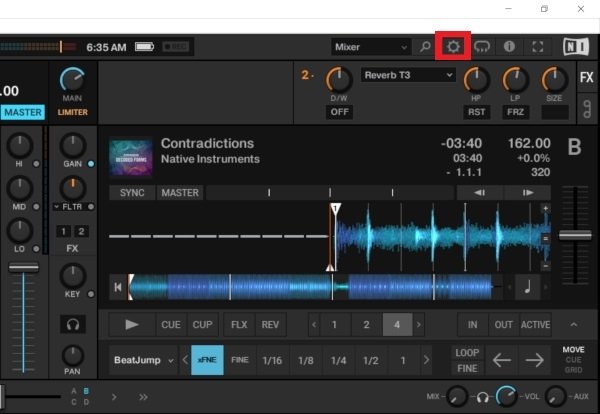
To configure the sound card, open the Traktor settings with the icon in the upper right corner or from the top menu bar if you are in windowed mode using the File>Settings path.
 Open Traktor’s settings
Click on the Audio Setup menu on the left. Expand the menu in the Audio Device field to see the available sound cards.
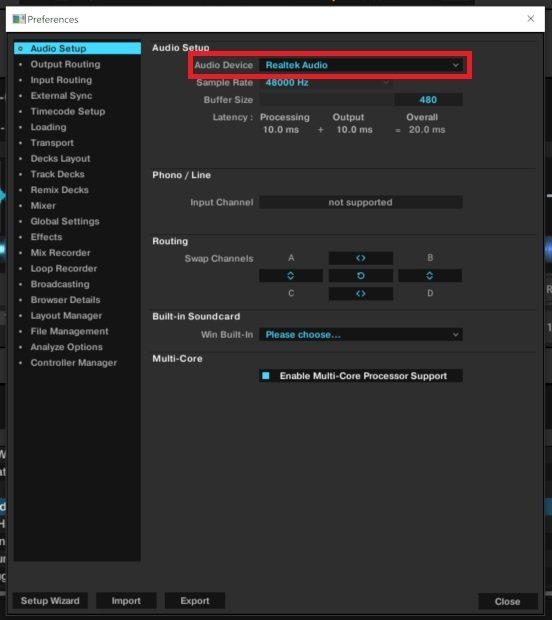 Open the list of audio devices
In the list that is displayed, choose your audio device. It can be your computer's integrated card, any external card connected to the PC, or drivers compatible with your own sound card.
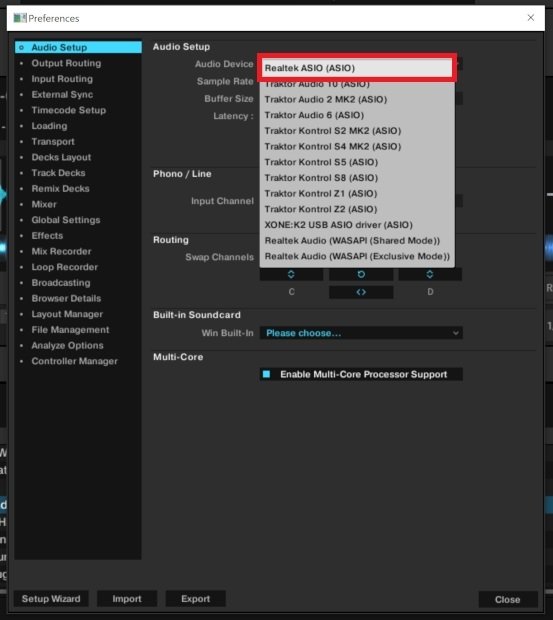 Select the audio device
Be sure that the inputs and outputs of your audio device are correctly activated and configured in Traktor. To do this, go in the left menu to Output Routing and confirm that the master output is correctly assigned to your computer's speakers.
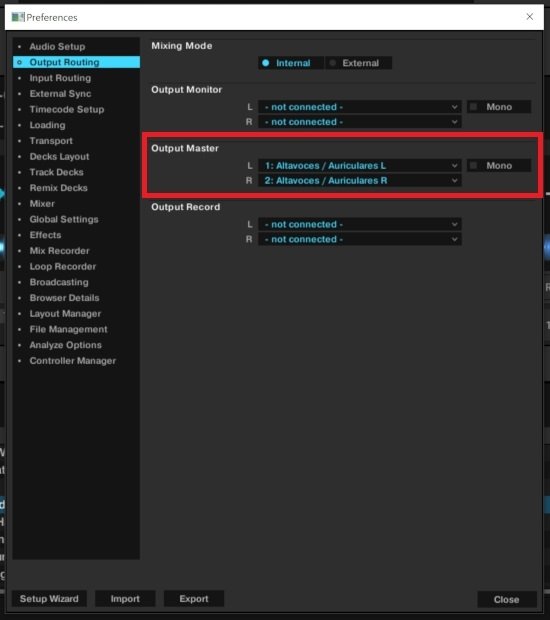 Configuring the master output
How to change the view and customize the interface in Traktor
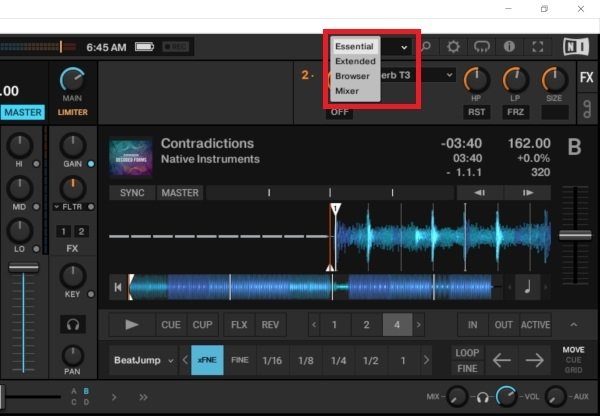
As we saw at the beginning of the guide, Traktor's basic interface shows two players, a mixer and the browser. However, this interface can be customized in many different ways. To begin with, 4 different types of views let you change the focus on different parts of the software. To switch between them, look for a drop-down menu with 4 options at the top right:
 Traktor’s view selector
- Essential: It displays the four available players and dispenses with the mixer, navigator, and master signal controls at the top. Designed to focus attention on the files being played back.
- Extended: It continues showing the four decks but extends the view with some master and playback control fields, such as the MOVE, CUE, and GRID tabs for each deck.
- Browser: It expands the browser to full screen to let you browse through the files in your storage.
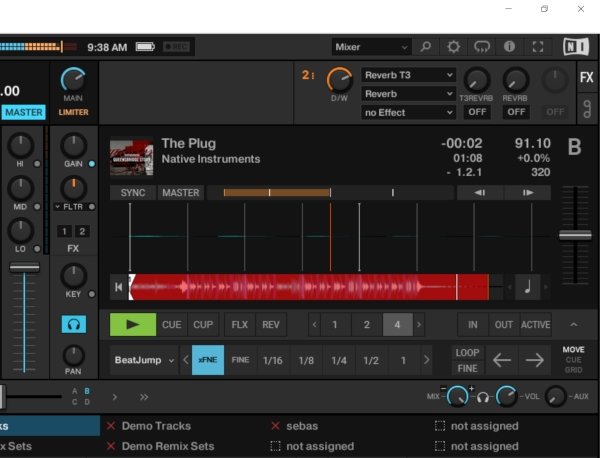
- Mixer: This is the usual decks and mixer view with equalization, monitoring, and mixing controls. This is the same view you saw in the first part of our guide as we went through the basic operation of the software.
You can make all kinds of adjustments to each view that will modify the look and feel as well, so you find the perfect custom view and settings for your needs. Displaying 2 players is not the same as displaying 4, neither is displaying them with their functions fully extended or in a compact format as we will see later. Depending on your settings, your display will adapt to the circumstances to show you the information.
How to configure audio players in Traktor
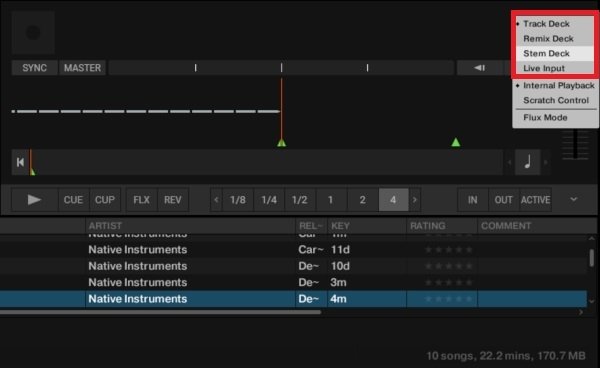
Audio players have several modes of operation. Most of them act as players for previously downloaded full songs, but Traktor lets you be way more creative and offers the possibility for them to act as Stem players, as Remix Decks, or as a simple signal input channel. To change the function of any deck, move the pointer to the deck letter and click on the options menu. Then, choose the option you want.
 Choose the type of player for each channel
- Track Deck: for song playback (Track B in the image above).
- Remix Decks: they are kits of sample audio that can be played in different ways. They try to emulate the classic sequencer drum machines (Track A in the image above).
- Stems: these are audio files that separate different groups of instruments in a piece of music, thus letting you play only certain instruments: only bass, synthesizers, bass and drums, and such (Track C in the image above).
- Live Input: these are just signals from third-party instruments that are fed into the software through a sound card.
On the other hand, the players can be customized by displaying more or less information. A simple double-click on the title area in the player will let you switch between options for a more compact or detailed display. That will make visible some useful fields such as the CUE and Hot Cue points of each song, the time grid tools, or the motion controls over the playback to set beats as accurately as possible.
The customization options are very extensive and can be investigated in depth in the software settings within the menus.
It can also be used with time control vinyl, but you will always need to use the Scratch version of Traktor, a sound card with at least two input and two output channels, and the corresponding control vinyl.
How to synchronize two songs in Traktor
When it comes to mixing music, the synchronization of the songs is very important. In Traktor, there are two ways to synchronize the speed, manually and automatically. To do this manually, you will need some kind of controller or keyboard shortcut that lets you modify the speed parameters. For automatic synchronization, you can use the Sync option, which will automatically synchronize your songs taking into account the playback speed and the grid of each song.
The first thing to do is to define a playback speed in BPMs. On the top of the mixer, there is a section dedicated to this function, make sure you are in a view that makes it visible. Use the text box to enter the value you want.
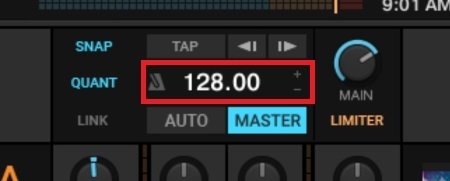 Select the general master speed
Now, select Sync in every player. By doing so, the speed of your songs will have been automatically adjusted to the value we have indicated above, and your songs will be at the same speed so that they can be played back smoothly.
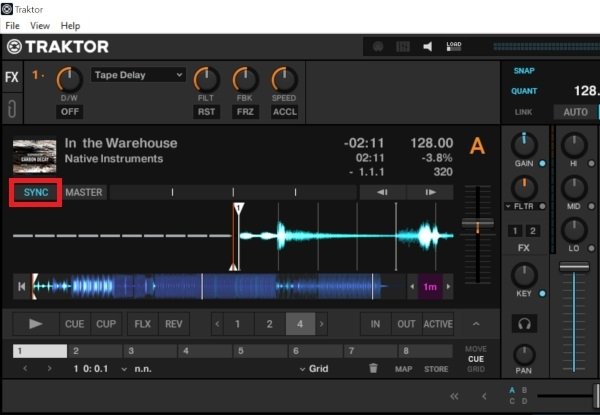 Automatic speed adjustment sync function
There is also the option for one song to act as master and the next as a slave, adjusting its speed to that of the master song. To do this, select the Master option on the player to be the master and the Sync option on the slave. From now on, the song in playback will always be the master song, and therefore, the one that sets the playback speed of the rest. As you load new songs into the players, they will first become slaves and then masters of the speed of your music session.
How to use effects in Traktor
Traktor offers a complete effects module freely assignable to the different players we use. It offers lots of different effects. To use them, first make sure you are in a view where the FX shortcuts in the upper corners of the interface are visible.
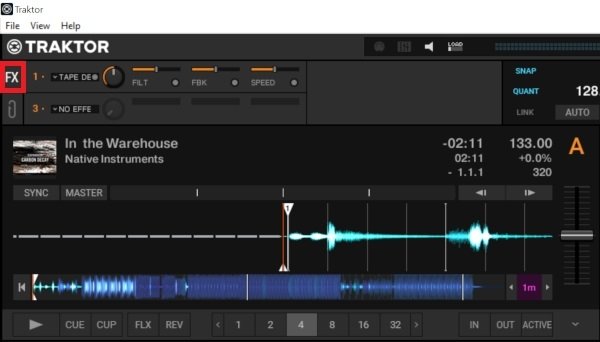 Accessing the effects module
The effect module has a drop-down menu that lets you choose from all the available effects.
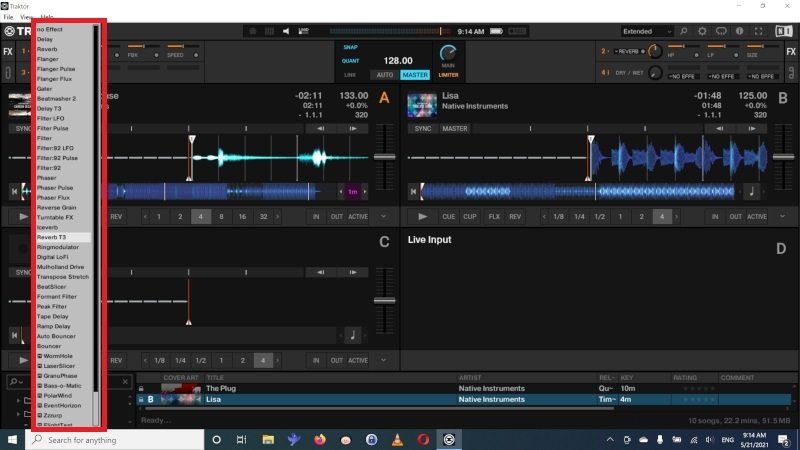 Effects available in Traktor
By choosing one of them, you can control the effect parameters with different knobs and buttons. Note that you can use up to 4 different effects if you make the corresponding setting in Traktor, but the module interface will not be the same if you use 4 effects compared to only 2, since in the latter case, there is more space, and as you can see, it is easier to see what we are doing.
 Extended effects module
How to use them? Each of the mixer channels has buttons numbered from 1 to 4 depending on how many effects you have configured. Just click on each button to send the signal of that channel to the corresponding effects module. Use the Dry/Wet main parameter in each effect to apply the effects with more or less intensity on the signal.
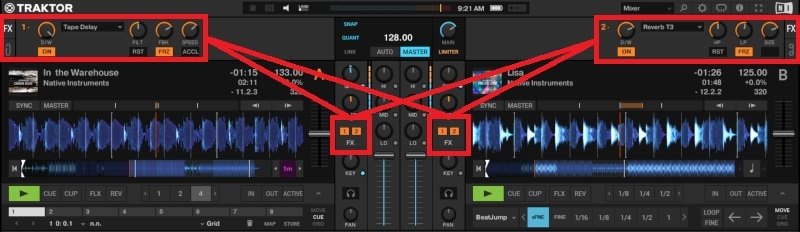 Sending the signal to the effects module
To multiply the fun, the effects can work in two different ways:
- Single Mode: a single effect that can be controlled by three parameters via knobs and occasionally other related function buttons as we have seen.
- Group Mode: up to three effects grouped in a chain with simplified controls for more complex chain effects. If you consider that there are 4 slots for effects and that with this mode you can group 3 effects in each slot, you have up to 12 simultaneous effects if your processor and RAM can handle it.
How to use Traktor's pre-listen
Traktor offers a built-in virtual mixer perfect for mixing music on your computer. This mixer has faders, equalization, filters, and some very interesting additional functions. But when it comes to mixing music, one of the main concerns of every user is how to distinguish the master signal from the internal signal or CUE that serves the DJs to prepare the next song in their session.
Like any physical mixer, the Traktor digital mixer offers a general signal and an internal signal that you can switch between at any time. To do this, go to the Mixer view and look at the right side of the crossfader where there are three knobs, two of them connected by a headphones icon.
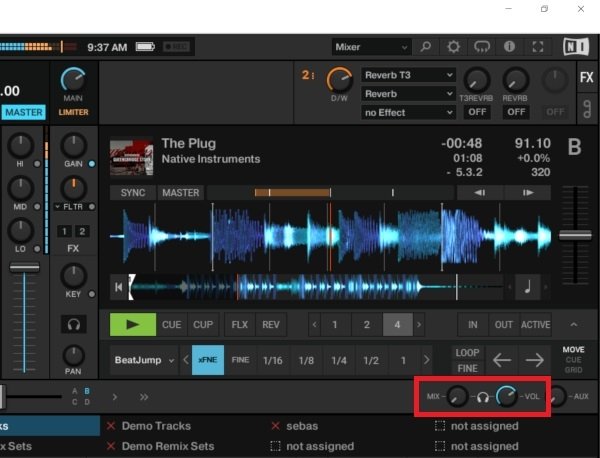 Pre-listen section
The Mix knob on the left lets you listen to the CUE or internal signal, in other words, it is independent of the fader. To choose the signals to be heard on this internal line, press the headphone button on each channel of the mixer.
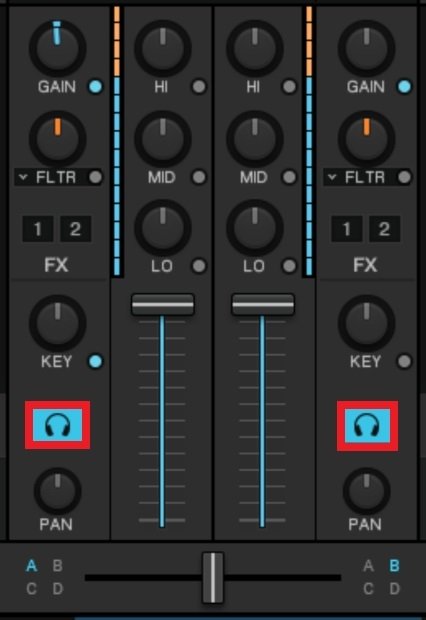 Monitor button to listen to the internal channel
The VOL knob, as you can imagine, is just the volume control of the headphones. Do not get confused, it is not the general sound output volume.
 Pre-listen volume
Keep in mind that without a dedicated sound card with at least a couple of inputs and outputs, you will not be able to hear both the master signal and the internal signal at the same time, you will only be able to hear simultaneously one of the two.
How to control Traktor's master signal and record sessions
In this final part of the guide, we will look at two other key functions such as the overall volume and the recorder for recording sessions.
The master signal volume control is located at the top of the interface. Be careful because it is one of those fields visible or not visible depending on the view and interface settings we have made. The same knob has a VU meter that lets you control when the signal starts to distort. Remember that this is the overall master volume of the mixer, it is neither the pre-listening volume nor the recording volume. You should be careful when handling this control, especially if you are connected to high-powered sound equipment. If this is the case, use the Limiter control just below, applying a safety margin to the volume to avoid distortion or greater problems.
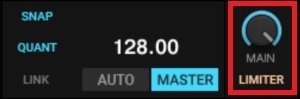 Master signal control
The audio recorder is accessible from the upper right corner as long as the view and view settings let you do so. The symbol may seem a bit strange, but it is intended to refer to cassette tapes. All you have to do is click on the REC button (disabled in demo mode) to start recording.
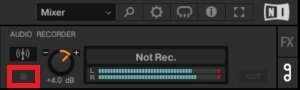 Audio recording
Use the Gain control to control the volume of the recording, the VU meter will give you all the information you need. When you are done, click the REC button again and the recording will be available in the folder you have configured in the Traktor settings.
We have barely been able to explain the most fundamental things about Traktor. Keep practicing and learning to know for example how to use an external mixer or time control vinyl, how to set up keyboard shortcuts or external control surfaces, how to use all loop functions, how to use the LINK function to synchronize with other music programs, how to broadcast over the Internet using programs like OBS and platforms like Twitch. By combining all this knowledge you can become the best DJ in the world.
