

One of the latest hits in the world of the Internet and particularly software are deepfakes. You still do not know what I mean? A couple of months ago, a Reddit user, who is always an immeasurable source of procrastinating knowledge, was kind enough to share his latest creation with the community: FakeApp, a software that through the use of artificial intelligence, lets you change the faces of people in a video for others, generating a new video with them. Soon after you consider this idea, you will think of faceswap mobile apps that let you exchange faces in real-time or even worse, videos that have been circulating for some time on the net and especially in these last weeks of famous people doing shameless things.
The scandal has reached such a magnitude that Reddit closed the threads dealing with FakeApp, but success is already assured and now even alternatives that do the same thing are starting to see the light. If we take into account that the original developer has not been intimidated by what happened and that he continues to develop his tool and make it easier and easier to use, we can expect tons of deepfakes during the next times.
FakeApp has opened a whole world of possibilities and a deep debate about the ethical limits of artificial intelligence (well, this debate already existed), of the network and its users. But since we are not here to tell you what to do, but to tell you how the hell it works so that you can create your own fake videos, we are going to skip that part.
There are three things to keep in mind before starting this tutorial:
- The first is time. Do not expect to get the perfect video you have in mind for the next few minutes. It may take hours for the magic of FakeApp to take place.
- On the other hand, this is not a tutorial for low-end computers: you need to have at least 8GB of RAM if you do not want to die in the attempt (if you have 16GB, that is better) and also an NVIDIA graphics card to process all that information through the GPU. You can put the CPU to do the same job, but you will have to add extra hours to the process.
- One thing that is obvious but not said so far: you need videos. On one hand, you need the video where you want to replace the faces, and on the other hand, the video with the new faces you want to place. Only by feeding the AI of the software with enough face photos, you will achieve the desired results.
How to use FakeApp step by step
This tutorial is written about FakeApp version 2.2. If you try to follow our steps with a different version of FakeApp or any of the other necessary programs, we want to make clear you probably will not be able to finish your video. Pay close attention to the software we indicate and especially to its versions. If you already have an earlier or later version of any of these programs installed, we recommend that you uninstall it and install exactly the version indicated here.
In addition to a powerful PC as we have said, you need to install additional software on your computer. On one hand, you need to install NVIDIA Cuda 9.0. It is necessary to install both the base file and the patch launched last January 25th. There is a new patch but it is not necessary for version 2.2 that we have tested to work. You also need Visual C++ Redistributable 2015.
The first thing is to download the software. Be careful because version 2.2 is over 2GB of data distributed between the executable file and the additional library needed, make sure you have enough space available. Once you have downloaded both packages, if you try to run the EXE, it will start, but it will show you a window warning you that you need to install the library in the right place before you can start. About the library, which is the heaviest, just unzip it and take all its contents to the AppData FakeApp folder, the system folder that stores the data of installed programs.
 FakeApp’s Get Dataset tab
Once you are in front of the FakeApp interface, the process starts. As you see, it has three different tabs that you can access by clicking on each of them at the top of the interface: Get Dataset, Train, and Create.
First of all, you must get the images of the faces you want to use, both the face of the original video (if the original video has a high resolution, the result in the final video will be less credible) as well as the new face you want to put on it. FakeApp offers two ways to do this: an internal system capable of extracting frames from videos and then trimming the faces detected in them, or through a folder with images. Obviously, the second option is more tedious, as it is more difficult to download 100 photos by hand than to take them automatically from a video. One important thing that we have not discussed: FakeApp, in theory, can extract more than one face from a video or a photo folder, but the reality is that it is a function that still does not seem very finished. At the moment, you get better results if you focus only on one face.
 Extracting frames from a video
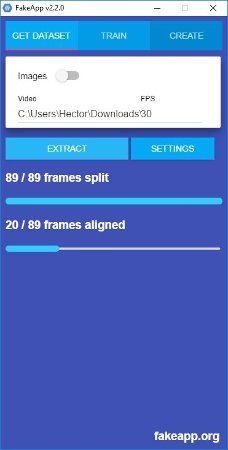
In the "Get Dataset" tab, indicate the path of the folder where you have the video. If they are images, be sure to move the knob at the top of the interface. You can also define the frames of the original video. Then, click on Extract to start the process. If everything is correct, you will see two lines of progress, the first one where the software takes care of extracting the frames, and a second line where it cuts the images to keep only the faces. It is very important that once it is finished, you check that all the images obtained are 256x256 pixels and are in PNG format.
 Folder with images ripped from a video
If something goes wrong, an error window will appear warning you that you can find information about the problem in the logs created by the same software, but you should visit the configuration panel to get started. Here are several important things to comment on. The first one is that you can choose if the processing will be done by GPU or by CPU. If your video card is not powerful enough, you can try with the CPU, although it takes more time. The second important thing to comment on is the one we are dealing with now, the one to solve possible problems during this process: Reduce the Batch Size, Nodes, and Layers fields progressively until you get a configuration that manages to take and crop the images correctly (the configuration you see in the screenshot below has worked for us). Here, everything is based on the "trial and error" method. Of course, FakeApp is not on par with commercial software when it comes to stability.
 FakeApp’s settings during the image extraction
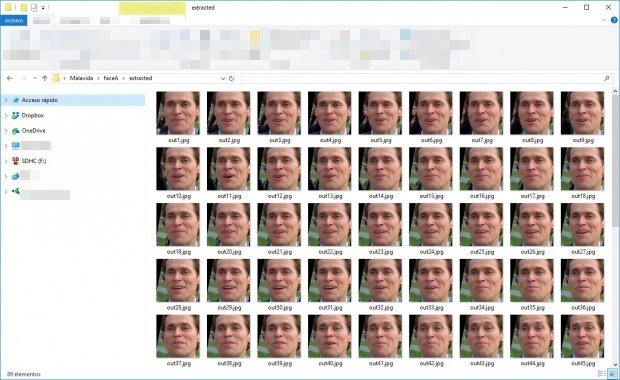
If you go around the folders where you had the original videos, you will see that FakeApp has created two new folders, one nested inside the other. The first is that of the extracted whole frames, and the second is that of those images cut out so that only the face is seen. Well, create somewhere on your hard drive a new folder, and inside it, two folders called "dataA" and "dataB", and a third called "model".
In "dataA", you must copy and paste all the photos of the trimmed side of A, which in our case, is the main character of the original video. In "dataB", you must copy and paste all the photos of the trimmed face B, which is the new face that will appear in our video.
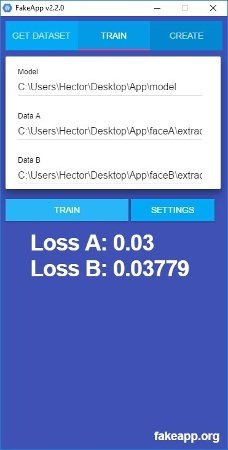
It is time to go to the second tab of the interface, Train. In this part of the process, FakeApp is in charge of training your artificial intelligence from the set of images that we indicate. Here is one of the keys to the process: the more images you have of higher quality and more varied in light situations, perspective, and so on, the better final results you will get, but more training time is required, more chances of something going wrong, and therefore, more PC processing.
 FakeApp’s training process
In the field, Model copy and paste the path of that folder that we have just created in the previous step. Do the same in the Data A field and the Data B field. Make sure that by copying and pasting these directory paths, you have not left any quotes in front or behind, and click the Train button without fear. If everything is right, FakeApp will get a hold of the material you have given it. When the process is finished, you will be notified, but it is good to know that you can stop the training at any time and continue it later simply by closing the app. Has something gone wrong? Check the settings configuration, and if necessary, reduce the Batch Size, Nodes, and Layers fields further.
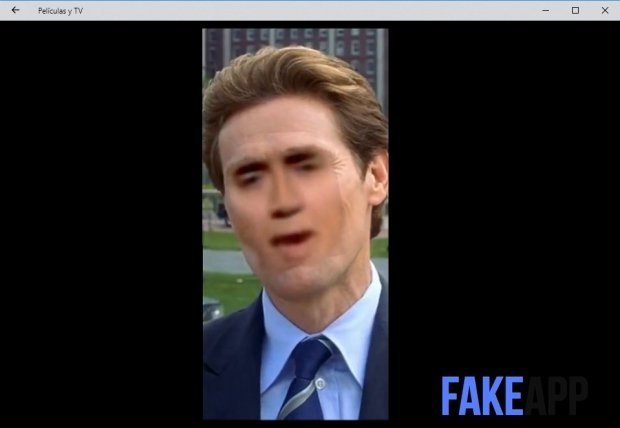
After a while, hours or days as you want better or worse results, FakeApp will automatically close and the fan of your PC can finally rest. At that time you must go to the third tab of the interface, Create. This is where the final magic takes place by generating the final modified video. First, you must indicate the path to the Model folder, where, if you have noticed, different files are created after the training process. Below, you must specify the path of the video we want to use and the FPS. When you have it, click Create and AppFake will start generating the final file. Once it is completed, it will notify you and inform you of its location.
 Final video creation process with FakeApp
Now, you just have to hit play. Do you have the expected results? Remember that the more and better quality images of faces you have, the better, although where much of the secret is in the training process of artificial intelligence. To get better videos, put the AI into training for longer. With insistence, you will achieve the almost perfect video.
 Aspect of the final video, more training is required
For those of us with the face of Nicolas Cage, it has been a bit of a mess, but I have been training for days with the face of my bosses and co-workers for a few things. Get the software yourself, be patient, and enjoy the fake videos on the Internet.
